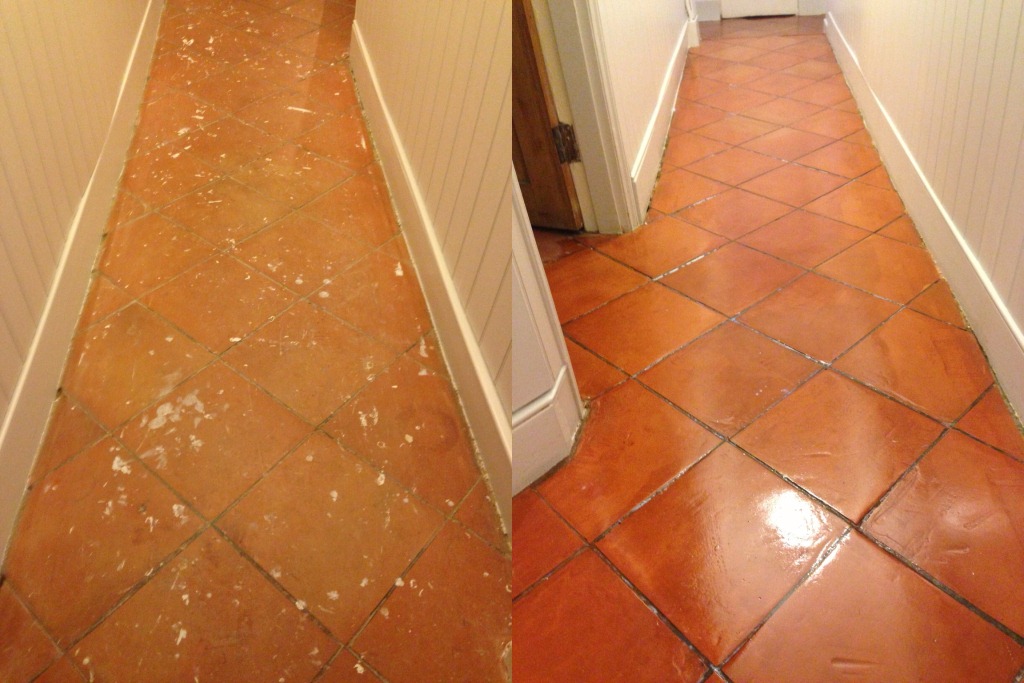

Quarry Tiled Hallway Floor Cleaned and Sealed in Brixton
These photographs are from a Quarry Tile Cleaning job we did for a lady in Brixton recently, as you can see from the early pictures they were not only dirty but there was also evidence of an old sealer and splashes of paint on them as well both of which would have to be removed first.
 |
 |
Cleaning Hallway Quarry Tiles
The first task we did on arrival was to disconnect her cooker and washing machine which were placed outside in the garden, this would allow us to get at all the tiled areas and also meant there was less to protect.
Working in small sections the next step was to pre-wet the floor tiles followed by adding a dilution of Tile Doctor Remove and Go combined 50/50 with Nanotech UltraClean, these two products combine to make a powerful cleaner/stripper that’s safe to use on tile. The cleaning solution was left to soak into the tile whilst we set up all of our equipment and added protective coverings to the kitchen units, walls and adjoining floors.
After about forty five minutes we re-wet the areas and hand scrubbed the tiles using scouring pads. This process was repeated covering small areas at a time until the kitchen was finished. We then used our scrubbing machine with a medium brush head fitted and thoroughly rinsed the floor to remove any trace of chemical.
We needed the floor dry for sealing so a couple of Turbo blowers we setup to force dry the floor and this took a couple of hours before my moisture meter told me that the floor was dry enough.
Sealing Hallway Quarry Tiles
After discussing sealer choices with the customer it was decided to seal the floor with Tile Doctor Colour Grow which provides a natural finish whilst lifting the natural colours in the tile. Two coats were sufficient and once it had dried we refitted the cooker and washing machine, put all the plinths back and removed all of our protective coverings.
 |
 |
The lady was really pleased with our work and left the following testimonial.
“Bill did a fantastic job on my kitchen floor, I can’t thank him enough. Mrs Scott, Brixton”

Quarry Tile Renovation in Brixton
Quarry Tiled Hallway Floor Cleaned and Sealed in Brixton Read More »