hallway

Victorian Tiled Hallway Before and After Restoration Fulham

Heavily Soiled Victorian Tiled Hallway Restored in Fulham

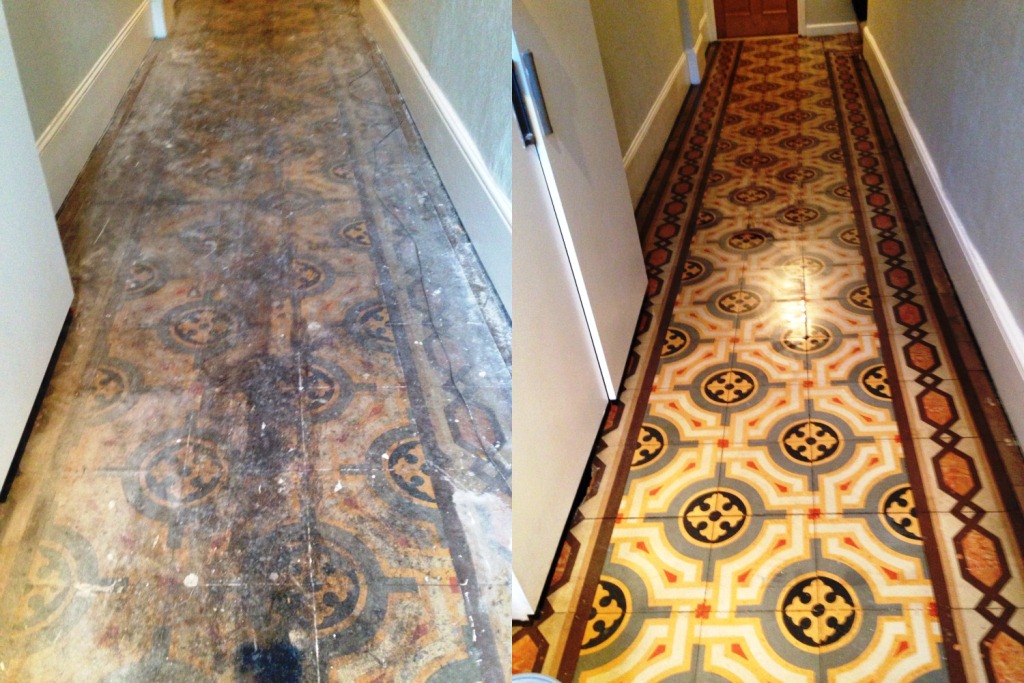
This Victorian tiled floor at a house in Fulham was in an absolutely horrendous state. As you can see from the first photograph, the tiles were caked in layer upon layer of muck, including paint and glue stains. This was due to the floor being unknowingly hidden for many, many years under carpet.

Victorian Tiled Hallway Before Restoration Fulham
Needless to say, the property owner was desperate to remedy get the fantastic pattern floor back into good nick, and so contacted me for assistance. I travelled up to the property in the town of Fulham in South West London, which is famous for its football club, to survey the situation and begin the work. It was immediately clear that the thick layers of dirt and staining would need to be removed, before being treated to a new seal to provide long-lasting protection.

Victorian Tiled Hallway Before Restoration Fulham

Cleaning a Heavily Soiled Victorian Tiled a Floor

My product of choice for removing the extremely heavy soil buildup on the tiles was Tile Doctor NanoTech HBU (formerly UltraClean), a powerful solvent-based cream cleaner. What makes this product different from standard cleaners is its use of nano-sized cleaning particles to penetrate below tough stains, dissolve them, and lift them to the surface. NanoTech HBU is a highly versatile product which can be used on most types of natural stone floor, both polished and unpolished.

I laid down the NanoTech HBU and left it to dwell for a short period on the tiles, allowing it to begin eating through the dirt, before using a scraper in combination with a steamer to manually lift the muck away from the tiles. Next, to tackle the glue and paint marks, I applied Tile Doctor Remove and Go, a stripper specifically designed to break down adhesive and solvent stains, and then used a scraper and a scouring pad to manually remove the glue and paint in the affected areas.

Once this was done, I scrubbed in some more NanoTech HBU to dissolve any remaining muck before rinsing the area thoroughly with clean water. To complete the cleaning process, I laid some down some Tile Doctor Acid Gel, which is a blend of Phosphoric and Hydrochloric acids in gel form, to eliminate inherent grout haze and alkaline mineral deposits in the affected areas. I then left this to dwell for ten minutes before giving the floor a final rinse to remove any chemicals and soiled residue. The floor was left for a week to dry out before I returned to seal it.

Sealing a Victorian Tiled Floor

With these fantastic Victorian tiles now muck-free, I proceeded to seal the floor. I initially applied a single coat of Tile Doctor Colour Grow, which is an impregnating, colour-enhancing sealer that really brings out the colourful features of patterned Victorian tiled floors like this one.

Victorian Tiled Hallway After Restoration Fulham
Once this initial coat of sealant had dried in, I asked the customer which kind of finish she preferred for the floor. She decided on a sheen finish, and so I laid down an extra five layers of Colour Grow to ensure the desired appearance, as well as to guarantee durable surface protection against dirt, stains and spillages.

Victorian Tiled Hallway After Restoration Fulham
The customer was really pleased with the results of the restoration, and left the following feedback:

“Bill worked extremely hard to clean and seal our hall tiles. Everyone is amazed at how good they look. We are extremely pleased with the results.”

Victorian Tiled Hallway Before and After Restoration Fulham
Another great Victorian tiled floor brought back to life, and and satisfied customer!

Professional Victorian Tiled Hallway Restoration in South London

Heavily Soiled Victorian Tiled Hallway Restored in Fulham Read More »

Victorian Tiled Floor Balham Before and After

Restoring a Victorian Tiled floor hidden under Carpet in Balham

This post is from a house in Balham where the owner was doing some renovation work and after deciding to change the flooring in the hallway they discovered an original Victorian tiled floor. They planned to restore the floor unfortunately however their builders did not listen and didn’t bother to put down any protection when decorating leaving it in a worse condition than when they found it.

Victorian Tiled Floor Balham Before Cleaning Victorian Tiled Floor Balham Before Cleaning

Cleaning the Victorian Tiled Floor

To initially clean the floor I put down a 50/50 mixture of Tile Doctor Pro-Clean and Nanotech Ultraclean diluted with four parts water; this creates a powerful alkaline cleaner that is safe to use on tiles and contains tiny abrasive particles to cut through the grime. This solution was left to dwell on the tile for twenty minutes before being agitated using a rotary machine fitted with a black scrubbing pad. This action did well to deep clean the tiles and remove dirt but there was still plenty of other problems to deal with including paint from the decorating and glue from the carpet.

To remove the glue and paint I treated the surface with Tile Doctor Remove and Go which as its name suggest is designed to remove coatings from the surface of tiles without damaging them. Working in sections the product was left to dwell for forty minutes on the surface of the tile before being worked in by hand into the glue and paint. Once it had all been removed I gave the whole floor a scrub with Grout Clean-Up to remove grout from the surface of the tile and this brightened up the colours. Last step was to give the floor a thorough rinse down using clean water, this is quite important and you need to ensure any trace of product has been removed before sealing. The water was removed using a wet vacuum which literally sucks the water off the floor and reduces drying times, the floor was still fairly damp at this stage so we called it a day leaving an air blower in place to help the floor to dry overnight.

Sealing Victorian Tiles

When I came back the next day I decided to seal the tiles using Tile Doctor Colour Grow which is an impregnating sealer that penetrates into the pores of the tile blocking any dirt from getting in and making the tiles easier to clean.

Victorian Tiled Floor Balham After Cleaning Victorian Tiled Floor Balham After Cleaning

Two coats were sufficient and Colour Grow also brings out the colour in the tile improving its look, certainly my customer thought so as all they could say was:

“AMAZING I didn’t think it was possible to get like this.”

Victorian Tiled Floor Balham Before and After
 

Victorian Floor Restoration in Balham

Restoring a Victorian Tiled floor hidden under Carpet in Balham Read More »

Limestone Floor Fulham Before and After

Limestone Tiled Floor Cleaned and Polished in Fulham

This Limestone tiled floor was installed at a property in Fulham, I was asked round to quote for cleaning the floor and whilst I was there I did a patch test. The test worked very well and the owner couldn’t believe that the grout was actually white not dark grey.

Limestone Floor Fulham Grout Cleaning 1

Cleaning Polished Limestone Floor Tiles

The first step was to give the floor a quick sweep to remove any surface grit etc. Before starting the burnishing process which we use on hard stone surfaces such as polished Limestone to clean and bring up the shine on the floor. The burnishing pads and encrusted with diamonds and come in a pack of four consisting of Coarse, Medium, Fine and Very Fine 17” pads. I started with a coarse pad which removes sealers and dirt from the floor, a little water is added to lubricate the process.

Limestone Floor Fulham Before Cleaning Zoom 2 Limestone Floor Fulham Before Cleaning 3

Once we had finished with the coarse pad the grout was cleaned up using Tile Doctor Pro-Clean diluted 1 part cleaner to 4 parts water. The solution was then scrubbed into the grout with a stiff hand brush until it was clean. The floor was then rinsed with clean water to remove any cleaning products and we then continued with the remaining burnishing pads applied in order with Medium, Fine and Very Fine until the floor was thoroughly cleaned and polished. We left for the day at this point to allow the tiles to dry overnight.

Limestone Floor Fulham Before Sealing 4

Sealing Limestone Floor Tiles

The following day we returned to seal the floor using two coats of Tile Doctor Colour Grow which is a great sealer for natural stone such as Limestone as it works to lift the colours out of the stone. The last step was to buff the floor to a nice shine with a rotary machine fitted with a white polishing pad.

Limestone Floor Fulham After Cleaning Sealing 5 Limestone Floor Fulham After Cleaning Sealing 6

The customer was really pleased with the result and couldn’t believe that the floor could look so good.

Limestone Floor Fulham Before and After
 

Limestone Floor, Cleaned, Scrubbed, Polished and Sealed in Fulham

Limestone Tiled Floor Cleaned and Polished in Fulham Read More »

Old Encaustic Floor Fulham Before and after Restoration

Old Encaustic Tiled Floor Restored in Fulham

I had an inquiry from a client in Fulham, who was representing the residents of an old building. The building had recently undergone redecoration and in the hallway, they had removed a thirty year old carpet to discover an original encaustic tiled floor underneath which turned out to be 102 years old.

Old Encaustic Floor Fulham Before Cleaning 1 Old Encaustic Floor Fulham Before Cleaning 2

As you can see from the photographs the floor was extremely dirty and covered in lots of glue and paint from the carpet and decorations. Naturally they were keen to have it restored and brought back to life. Given the condition of the tile and the age I to set their expectations and told them that although I was confident of making a big difference to the floor I couldn’t give any guarantees. I gave them my quotation and although it was slighter higher than what they had I mind, it was still less than other quotations that they had received and were also considering the option of replacing the carpet.

After a couple of days I received a call asking me to go ahead with the work and I booked it in.

Encaustic Tiled Floor Cleaning

My approach to the job was to initially spray a mixture of Tile Doctor Remove and Go combined with Tile Doctor NanoTech UltraClean which creates a powerful tile safe coatings remover with tiny abrasive particles that aid the cleaning process.

I left this to dwell on the tile for about fifteen minutes before scrubbing it in using a black scrubbing pad on my rotary machine. This approach removed some glue and a lot of old grime so I then sprayed down more Remove and Go and also used a steamer to loosen the remaining glue and paint. This process was repeated a section at a time until at the end of the day I gave the whole are a thorough rinse before packing away my equipment and leaving it to dry.

Encaustic Tiled Floor Sealing

I returned three days later and carried out a test with my moisture meter to make sure that the floor was dry enough to seal. The meter confirmed it was dry so I then sealed the floor using two coats of Tile Doctor Colour Grow which is an impregnating sealer that really brings out the colour in the tiles.

Old Encaustic Floor Fulham After Cleaning 3 Old Encaustic Floor Fulham After Cleaning 4

And as you can see the floor is transformed and now I have some happy residents who are really pleased that they opted to have the old floor cleaned instead of replacing the carpet. Not to mention that restoring such an original feature has probably added value to their investment as well.

Old Encaustic Floor Fulham Before and after Restoration 5

Original Encaustic Tiled floor cleaned and restored in Fulham

Old Encaustic Tiled Floor Restored in Fulham Read More »

Victorian Tiled Floor Balham After Cleaning

Victorian Tiled Hallway Restoration in Balham

Set of photographs here from a Victorian Tiled floor for a customer in Balham, South London. They had found the floor under an old carpet, and wanted to restore it. Unfortunately their builders did not listen and didn’t bother to put down any protection when they painted, as a result there was paint everywhere, I’ve include a detailed photograph below so you can see for yourself what a state the floor was in.

Victorian Tiled Floor Balham Before Cleaning Victorian Tiled Floor Balham Before Cleaning

Cleaning the Victorian Floor Tiles

Initially the floor was cleaned using a dilution of Tile Doctor Pro-Clean mixed 50:50 with NanoTech UltraClean which had been left to dwell for 20 minutes before being agitated using a rotary machine fitted with a buffing pad. I used a wet vacuum to remove the dirty cleaning solution and then realising something more powerful would be required to shift the stubborn stains and paint marks. To rectify this I applied a Tile Doctor Remove and Go which is a coatings remover and left it to dwell on the Victorian tile for forty minutes before applying plenty of elbow grease. This did the trick to remove the paint and glue etc. so I worked across the floor in sections applying the same treatment until the floor was completely clean.

Once it had all been removed I gave the whole floor a scrub with Tile Doctor Grout Clean-Up and this brightened up the colours and finally I gave the floor a very thorough rinse with clean water to remove any remaining cleaning product that might have an adverse effect on the sealer. I left the floor to dry over the weekend and returned on the following Monday to seal it, but first I carried out a couple of repairs because some of the tiles were loose so I reset them in cement.

Sealing Victorian Tiled Floor tiles

On my return I sealed the floor using two coats of Tile Doctor Colour Grow which is a penetrating sealer that provides maximum stain protection whilst bringing out the colour in the stone.

Victorian Tiled Floor Balham After Cleaning Victorian Tiled Floor Balham After Cleaning

All the customer could say was AMAZING I didn’t think it was possible to get like this.

Victorian Floor Cleaned and Sealed in Balham, South London

Victorian Tiled Hallway Restoration in Balham Read More »

Balham Slate Floor Before and After

Slate Tiled Floor restored to a natural finish in Balham, South London

This beautiful slate tiled floor installed in the kitchen and hallway of a house in Balham London; I was asked by the owner if we could restore the floor following some work that had been carried out by a builder who had failed in his attempts to remove the old seal. To instill confidence that we could complete the work we carried out a demonstration on a small test area which was enough to prove that money would not be wasted and we were booked for the job, we even agreed to clean the floor on Sunday and seal it on the Monday so it would be ready in time for visitors who were due on the Wednesday.

Balham Slate Floor Before Balham Slate Floor Before

Cleaning slate Floor Tiles

We cleaned the floor using Tile Doctor Pro-clean which is an alkaline cleaner safe to use on natural stone such as Slate; it’s very good at removing general dirt, grime and even grease. Next step was to remove the remaining sealer using Tile doctor Remove & Go which was applied to a small area at a time. I scrubbed the product into the slate and left it on the surface for a further hour making sure not to let the area dry out which temporarily made it look really dark (see photo below). Finally I gave the floor a through rinse to make sure that no chemical remained on the stone before sealing and then left for the evening.

Balham Slate Floor After Cleaning

Sealing Slate Floor Tiles

The next day I checked the floor was dry using a moister meter which thankfully it was and then started to seal using two coats of Tile Doctor Colour Grow which is a colour enhancing sealer design to provide maximum stain protection on natural stone floors whilst bringing out the deep colour in the stone and providing a natural matt finish.

Balham Slate Floor After Sealing

My customer was really happy with the results and left a nice testimonial on the Tile Doctor website, she has also booked me in to clean her driveway next month.

Balham Slate Floor Before and After-

Slate Floor Cleaned, Stripped and Re-Sealed in Balham, South London

Slate Tiled Floor restored to a natural finish in Balham, South London Read More »

Quarry Tile Cleaning Before and After

Quarry tiled floor restoration in Grove Park, South London

I recently completed this Quarry Tile restoration work for a young couple in Grove Park, South London. They were refurbishing their property and wanted to keep as much of the original features that they could. In the kitchen they had the original quarry tiles and had attempted to clean the floor themselves but we’re unsuccessful. I quoted for the job and took time to explain the process and which products I would be using.

They contacted me a couple of days later to let me know that they wanted me to carry out the work which was gratifying as I had put a lot of time into the quote. Turns out I got the job because they could see I knew what I was talking about giving them confidence I could do the work and another company had quoted twice the price I gave them and didn’t even pop round to carry out a site survey.

Quarry Tile Cleaning Before Quarry Tile Cleaning Before

Cleaning Hallway Quarry Tiles

I turned up at the agreed time and set about by cleaning the floor with a mixture of Tile Doctor Pro-Clean and NanoTech UltraClean which combine well together to produce a very effective cleaning product that is safe to use on tile and stone. The solution was worked into the floor using a rotary scrubbing machine fitted with a black scrubbing pad; after a while the soiled solution was removed using a wet vaccum and the floor was given a thorough rinse with clean water to see what I had left to deal with.

What was left was a mixture of paint, grease and sticky residues from old carpet tape and if that wasn’t enough there were limescale deposits. To tackle this a stronger product was required so I laid down Tile Doctor Remove and Go and left it to dwell on the tile for about 45 minutes which was sufficient to break down the stubborn marks and allow for them to be scrubbed out. Remove and Go is a strong coatings remover which as its name suggests should remove just about anything and with the exception of the limescale it lived up to its name.

I think it’s a fair statement to say that Tile Doctor have a product to treat every problem and to remove the limescale I used Tile Doctor Grout Clean-Up which is an acid based product usually used to remove excess grout but it’s also effective on the removal of mineral deposits; needless to say it removed the limescale without a problem. You do have to be very careful when using strong products like these on tile so I only left it on the floor long enough to do the job.

The last step was to fit a brush head onto my rotary floor machine and gave the floor a thorough rinse neutralising the floor and making sure that all trace of cleaning products were removed. Once I had finished I locked up the house and left the floor to dry for several days.

Sealing Hallway Quarry Tiles

When I returned I first checked that the floor was dry enough to seal using a moisture meter. The floor was dry so we started the process of sealing the floor with Tile Doctor Seal and Go, the Quarry Tiles were very porous and it tool seven coats of sealer before the tiles were completely sealed. Seal and Go was chosen as the customer wanted liked the low sheen finish this sealer provides whilst also offering excellent stain protection.

Quarry Tile Cleaning After Quarry Tile Cleaning After

The owners were absolutely delighted with the results and they put in a fantastic review about me on the Tile Doctor website.

“Bill Bailey provided an extremely professional and high quality service from first point of contact to end result. He took time to assess the tiles to be cleaned and approached the job with a genuine commitment to get it right and achieve the best possible results. He carefully explained all the processes involved and was able to answer all our questions and provide advice. We would not hesitate to recommend him very highly. Gemma, London

Quarry Tile Cleaning Before and After
 

Quarry Tile Renovation in Grove Park, South London

Quarry tiled floor restoration in Grove Park, South London Read More »

Quarry Tile Kitchen Floor Before and After

Quarry Tiled Hallway Floor Cleaned and Sealed in Brixton

These photographs are from a Quarry Tile Cleaning job we did for a lady in Brixton recently, as you can see from the early pictures they were not only dirty but there was also evidence of an old sealer and splashes of paint on them as well both of which would have to be removed first.

Quarry Tile Kitchen Floor Before Quarry Tile Kitchen Floor Before

Cleaning Hallway Quarry Tiles

The first task we did on arrival was to disconnect her cooker and washing machine which were placed outside in the garden, this would allow us to get at all the tiled areas and also meant there was less to protect.

Working in small sections the next step was to pre-wet the floor tiles followed by adding a dilution of Tile Doctor Remove and Go combined 50/50 with Nanotech UltraClean, these two products combine to make a powerful cleaner/stripper that’s safe to use on tile. The cleaning solution was left to soak into the tile whilst we set up all of our equipment and added protective coverings to the kitchen units, walls and adjoining floors.

After about forty five minutes we re-wet the areas and hand scrubbed the tiles using scouring pads. This process was repeated covering small areas at a time until the kitchen was finished. We then used our scrubbing machine with a medium brush head fitted and thoroughly rinsed the floor to remove any trace of chemical.

We needed the floor dry for sealing so a couple of Turbo blowers we setup to force dry the floor and this took a couple of hours before my moisture meter told me that the floor was dry enough.

Sealing Hallway Quarry Tiles

After discussing sealer choices with the customer it was decided to seal the floor with Tile Doctor Colour Grow which provides a natural finish whilst lifting the natural colours in the tile. Two coats were sufficient and once it had dried we refitted the cooker and washing machine, put all the plinths back and removed all of our protective coverings.

Quarry Tile Kitchen Floor After Quarry Tile Kitchen Floor After

The lady was really pleased with our work and left the following testimonial.

“Bill did a fantastic job on my kitchen floor, I can’t thank him enough. Mrs Scott, Brixton”

Quarry Tile Kitchen Floor Before and After
 

Quarry Tile Renovation in Brixton

Quarry Tiled Hallway Floor Cleaned and Sealed in Brixton Read More »

Scroll to Top