Reigate

Victorian Hallway Floor Restoration Reigate

Victorian Tiled Hallway Deep Cleaned and Sealed in Reigate

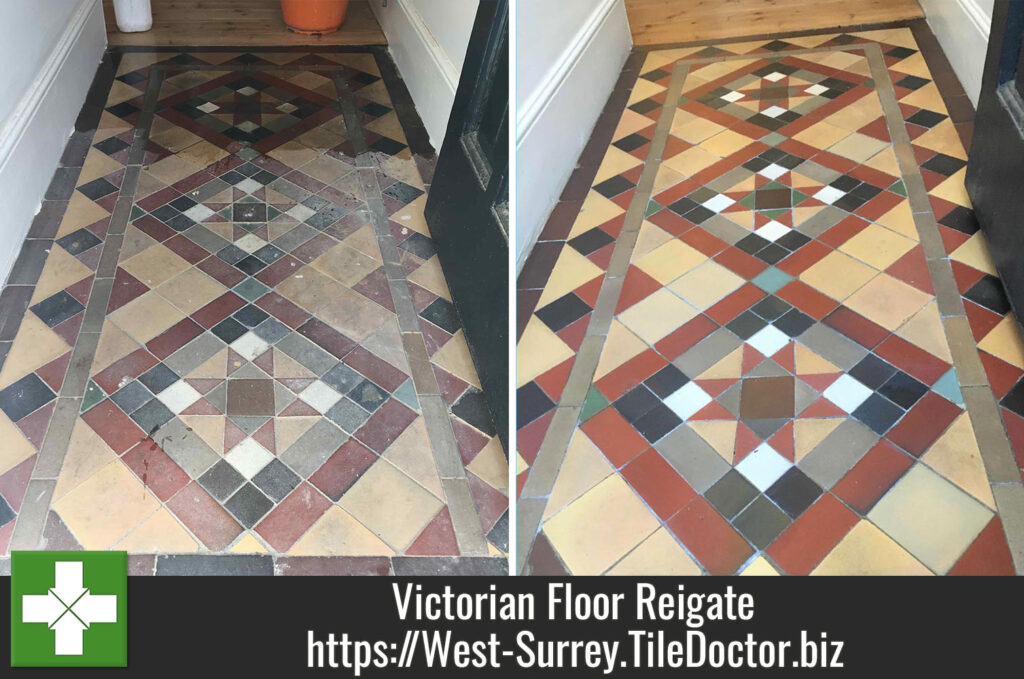
It had been a while since this Victorian tiled hallway at a property in Reigate had received a deep clean and re-seal and it was now looking quite unloved. The sealer had almost worn off and dirt had become ingrained in the pores of the tile leaving it dull and lifeless. Hallways floors receive a lot of foot traffic so do need regular attention if they are to look their best and this example was no different.

Fortunately, the floor was intact with no broken or loose tiles to deal with, there were a few chipped tiles in the floor but I think that adds character to a floor of this age. I worked out a quote to deep clean the tiles, flush out the dirt and add a fresh sealer to protect them. The quote was accepted and a date set for the work to commence.

Victorian Tiled Hallway Floor Before Restoration Reigate

Deep Cleaning a Victorian Tiled Hallway Floor

I started the work by applying a generous coating of Tile Doctor Oxy-Gel and left it to soak into the pores of the Victorian tiling for around 30 minutes. I used Oxy-Gel so as to minimise the use of water which can exacerbate efflorescence salt issues which is a typical problem of floors of this age that don’t have the benefit of a damp proof membrane.

Then using a very coarse 100-grit diamond encrusted pad attached to a rotary floor machine the tiles were given a good scrub. This process skims away a small layer off the surface of the tiles to remove the dirt and old coatings such as sealers. All the soil was extracted from the floor using a wet vacuum and I repeated this process twice for maximum effect.

At this point the tiles were already looking significantly better but I hadn’t finished yet. I still needed to deal with the edges and corners where the pad can struggle to reach. For this I use handheld burnishing blocks and more Oxy-Gel, you need a lot of elbow grease to do this but its an important step and can also be used to deal with any stubborn areas.

Once finished I used a little water to help rinse off the floor and the wet vacuum again to get the floor as dry as possible before leaving the floor to dry off completely overnight.

Sealing a Victorian Tiled Floor

The tiles need to be dry before sealing so the next day my first action was to test the floor for moisture using a damp meter. They passed and were ready to take a sealer which for this floor I used Tile Doctor seal and Go Extra. It’s super tough and ideal for doorways and hallways and leaves a nice sheen without being too shiny.

Victorian Tiled Hallway Floor After Restoration Reigate

Before leaving I left advice on how to maintain the tiles using Tile Doctor Neutral Tile Cleaner which is a gentle tile cleaning product that will clean the floor without impacting the sealer which can be a problem with many of the strong products you find in supermarkets.


Professional Cleaning and Sealing of a Victorian Tiled Hallway in East Surrey

Victorian Tiled Hallway Deep Cleaned and Sealed in Reigate Read More »

Marble Tiled Floor Before After Polishing Reigate East Surrey

Achieving a Deep Polish on Marble Floor Tiles at a Reigate Cottage

The photographs below are of a Marbled Tiled floor that was installed over much of the ground floor of a cottage that formed part of a large county estate near Reigate.

Marble Tiled Floor Before Polishing Reigate Marble Tiled Floor Before Polishing Reigate

The Marble floor tiles were lovely however the polish and sealer had worn off some time ago and the were now looking much worse for wear, additionally the once white grout had turned dark with dirt and I`m not sure even the owner realised its full potential. I provided a quote for cleaning and applying a deep polishing to the floor which was agreed and set a date to do the work.

Marble Tile and Grout Cleaning in Reigate

After protecting the wooden skirting with tape, I started the cleaning process by applying a medium dilution of Tile Doctor Pro-Clean which was scrubbed into the tiles using a stiff brush to remove any loose dirt and debris from the floor but primarily along the grout lines. The soiled cleaning solution was then rinsed off with water and then extracted with a wet vacuum.

Next step was to deep clean the tiles and bring back the polish using a set of four Tile Doctor diamond encrusted honing pads which fit a weighted rotary floor buffer and are applied in sequence starting with the 400-grit pad lubricated with water. This is followed with the 800-grit and then the 1500-grit pads rinsing with water after each pad and removing the soil generated by the burnishing process with the wet vacuum as before.

This work took much of the day so after applying the 1500-grit pad and rinsing I left the floor to dry out overnight.

Sealing and Polishing Marble Tiles with Shine Powder

The next day I started by applying the 3000-grit pad which is the final pad in the polishing process and really helps bring up the polished appearance of the Marble. The pad is applied to the floor dry using a little water sprayed onto the floor using a process we call a spray burnish.

The last step was to seal the Marble tiles and build the polish even further by applying Tile Doctor Shine Powder which is diluted with water and buffed into the Marble tiles using a white buffing pad. The shine powder did an excellent job of building the shine on the floor and provides a tough durable finish that should last.

Marble Tiled Floor After Polishing Reigate Marble Tiled Floor After Polishing Reigate

After two days work the Marble tiled floor looked transformed and I was especially pleased with the deep level of shine and restored white grout that I had managed to achieve.


Restoring Polish to Marble Floor Tiles in East Surrey

Achieving a Deep Polish on Marble Floor Tiles at a Reigate Cottage Read More »

Scroll to Top