South London

Victorian Hallway Before and After Restoration Brixton

Old Victorian Tiled Hallway Fully Restored in Brixton

I was asked to look at an old Victorian Tiled Hallway floor at a house in Brixton, South London. This classic floor had been discovered underneath an old hallway carpet while refurbishment works were being carried out. I went over initially in mid December to survey the floor and talked the owner through a number of similar restorations we had completed in the past. I could see this floor would need a deep clean to remove the years of dirt and also some tiling would needed to be done to tile a section of concrete near the stairs that had been dug out to lay pipe work when central heating had been installed many years prior. She didn’t want to make a commitment at that point so I left her with our quotation so she could think it over. I suspect she had other quotes to review however I’m pleased to say that she decided to give the work to us.

Victorian Tiled Hallway Before Restoration Brixton Victorian Tiled Hallway Before Restoration Brixton

Once we had agreed a date to do the work I started looking around for replacement tiles that would be needed to restore the floor. Unfortunately the octagonal ones are not made anymore and I couldn’t hold of any salvaged ones either. Having been involved in Tile Restoration work for some time now, I have a list of companies and reclamation yards that are usually a good source for these materials. To resolve the problem I sourced square tiles with a similar look and would cut them to the same shape when on site.

Victorian Tiled Hallway Before Restoration Brixton

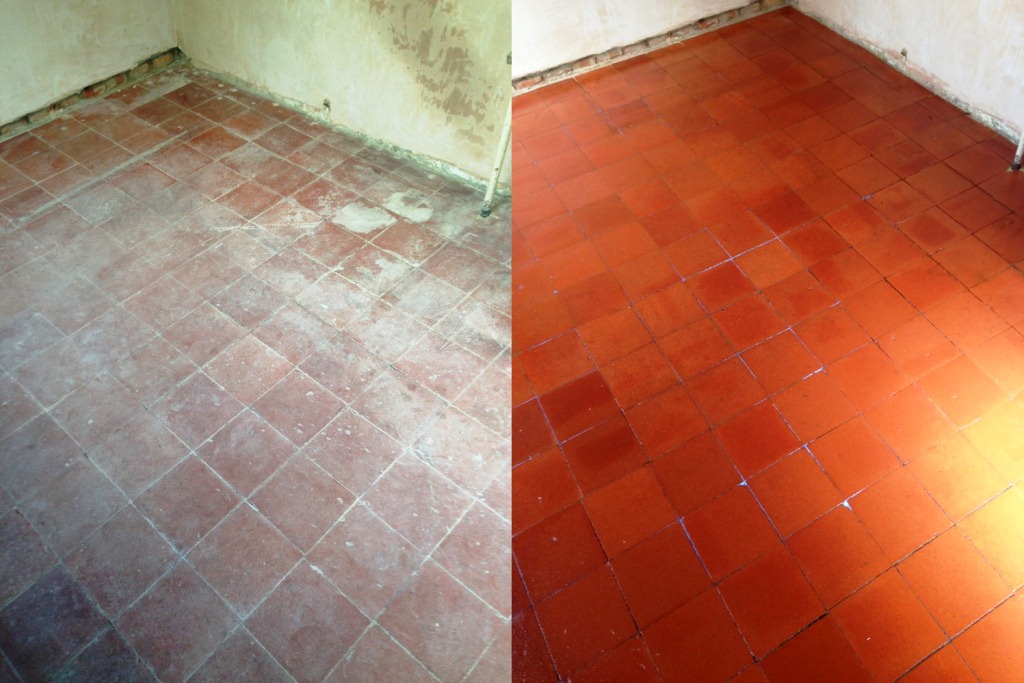
Cleaning and Repairing a Heavily Soiled Victorian Tiled Floor

I returned after Christmas to start the restoration process which was due to take two to three days. To start the restoration process we applied a strong dilution of Tile Doctor Remove and Go to the floor, allowed it to soak in for ten minutes and then worked it into the tiles using a scrubbing pad fitted to a rotary machine. Remove and Go is a product that removes coatings from tiles including in this case old paint splashes and carpet adhesive. The floor was then rinsed and the now dirty solution extracted using a wet vacuum.

Victorian Tiled Hallway During Restoration
Once this was finished the floor was looking cleaner and the next step was to tackle the concrete area near the stairs where the heating pipes had been buried. The cement had to be carefully chipped away and then refilled with fresh cement but to the level of the original surface so we could lay new tile on top. We use a quick setting compound for this and were able to start relaying and grouting the section with new specially cut tiles later that afternoon.

Victorian Tiled Hallway During Restoration Brixton Victorian Tiled Hallway During Restoration Brixton

Naturally the strip of new tiles were quite noticeable against the old and although the customer was happy I knew I could get a better result by running a very coarse burnishing pad fitted to a heavy buffing machine over the surface. I used a diamond resin hybrid 50 grit pad to take off the top layer of the tiles and then refinished the surface with a 100 and then 200 grit pad. This did the trick and it was impossible to tell the old and new apart.

After this I carried out an acid wash using Tile Doctor Grout Clean-up diluted with four parts water. The purpose of this was to remove any old grout smears and mineral deposits from the floor as well as counteract any possibility of unsightly efflorescence salts rising up through the tile at a later stage. This is quite a common problem with these old floors which don’t have a damp proof coarse and certainly I could see no trace of a DPC when I dug out the cement around the pipe work earlier.

The last step in the cleaning process was to steam the entire floor and then leave it to dry off fully over the New Year break.

Sealing a Victorian Tiled Floor

I returned on the 2nd of January and after inspecting the floor to ensure it was clean and free of damp I began to seal it using Tile Doctor Colour Grow which is an impregnating sealer that soaks into the pores of the tile protecting it from within and enhancing its appearance in the process. Four coats of sealer were needed and as you can see by the final pictures the final results were outstanding.

Victorian Tiled Hallway After Restoration Brixton
Period features such as old Victorian floors add a lot of value to and the customer was over the moon with the transformation and is so happy she chose to have the floor restored rather than covering it back up with carpet.

Victorian Tiled Hallway After Restoration Brixton
 

Professional Victorian Tiled Hallway Restoration in South London

Old Victorian Tiled Hallway Fully Restored in Brixton Read More »

Limestone Shower Tiles After Cleaning Wandsworth

Limestone Kitchen Floor and Shower Tiles Refinished in Wandsworth

Sometimes, Tile Doctor customers will have more than one tiled area in need of professional maintenance. At this house in Wandsworth, South London; I was commissioned to clean and seal firstly a Limestone tiled kitchen floor, and a Limestone tiled shower unit.

Limestone Floor Before Cleaning Wandsworth

Cleaning and Sealing a Limestone Kitchen Floor

I started with the Limestone tiled kitchen floor which, like many other stone floors had not been treated to the correct regular care and had become dull and dirty over time as a result.

My first task involved applying Tile Doctor Remove & Go stripper in order to break down any old surface sealant and dirt. Then, I began the burnishing process, which essentially involves polishing with pads of varying grit. I started with a Medium 800 grit burnishing pad to provide an initial polish and grind away ingrained dirt, before refining this with a Fine 1500 grit pad to achieve a smooth surface. The burnishing pads are used in combination with a small amount of water.

Limestone Floor During Cleaning Wandsworth
After leaving the floor to dry for 24 hours, I sealed the tiles with Tile Doctor Colour Grow. This will provide durable surface protection for the future and also further accentuate the great natural shades in the Limestone. To add the finishing touches, I buffed the floor with a soft white buffing pad.

Limestone Floor After Burnishing Wandsworth

Cleaning and Sealing a Limestone Tiled Shower Unit

During the time it took for the Limestone tiled kitchen floor to dry, I set my sights on tackling the shower unit. The unit was suffering from a terrible amount of limescale, which would need to be removed using a set of hand held burnishing pads. Limescale deposits build up on surfaces which come into contact with hard water, and can become very unsightly if not dealt with promptly.

Limestone Shower Tiles Before Cleaning Wandsworth
This proved to be a more awkward job thanks to the intricate Limestone fittings on the shower walls. I used the smaller 6-inch burnishing pads fitted to a hand buffer, while for the kitchen floor I naturally used the larger sized pads attached to a heavy weight buffing machine.

With the limescale as bad as it was, I started to grind it off with a Very Coarse 120 grit burnishing pad, before working my way up gradually through the system of pads – each time using a slightly finer grit pad until I finished with the Ultra Fine 3000 grit pad and the surface finish had been restored.

Limestone Shower Tiles After Cleaning Wandsworth
Following this, I removed the silicone sealant around the shower fittings, and dealt with the mould growing behind it.

On the second day of work, I sealed both the kitchen floor and the shower unit. Much like the kitchen floor, the shower unit was sealed using Colour Grow to ensure long lasting protection, and fresh silicon was also fitted.

Two days of work and two rejuvenated Limestone features later, I was left with a very happy customer.

Limestone Shower Tiles Before and After Cleaning Wandsworth
 

Restoring the appearance of a Limestone Kitchen Floor and Shower in South London

Limestone Kitchen Floor and Shower Tiles Refinished in Wandsworth Read More »

Balham Slate Floor Before and After

Slate Tiled Floor restored to a natural finish in Balham, South London

This beautiful slate tiled floor installed in the kitchen and hallway of a house in Balham London; I was asked by the owner if we could restore the floor following some work that had been carried out by a builder who had failed in his attempts to remove the old seal. To instill confidence that we could complete the work we carried out a demonstration on a small test area which was enough to prove that money would not be wasted and we were booked for the job, we even agreed to clean the floor on Sunday and seal it on the Monday so it would be ready in time for visitors who were due on the Wednesday.

Balham Slate Floor Before Balham Slate Floor Before

Cleaning slate Floor Tiles

We cleaned the floor using Tile Doctor Pro-clean which is an alkaline cleaner safe to use on natural stone such as Slate; it’s very good at removing general dirt, grime and even grease. Next step was to remove the remaining sealer using Tile doctor Remove & Go which was applied to a small area at a time. I scrubbed the product into the slate and left it on the surface for a further hour making sure not to let the area dry out which temporarily made it look really dark (see photo below). Finally I gave the floor a through rinse to make sure that no chemical remained on the stone before sealing and then left for the evening.

Balham Slate Floor After Cleaning

Sealing Slate Floor Tiles

The next day I checked the floor was dry using a moister meter which thankfully it was and then started to seal using two coats of Tile Doctor Colour Grow which is a colour enhancing sealer design to provide maximum stain protection on natural stone floors whilst bringing out the deep colour in the stone and providing a natural matt finish.

Balham Slate Floor After Sealing

My customer was really happy with the results and left a nice testimonial on the Tile Doctor website, she has also booked me in to clean her driveway next month.

Balham Slate Floor Before and After-

Slate Floor Cleaned, Stripped and Re-Sealed in Balham, South London

Slate Tiled Floor restored to a natural finish in Balham, South London Read More »

Quarry Tile Cleaning Before and After

Quarry tiled floor restoration in Grove Park, South London

I recently completed this Quarry Tile restoration work for a young couple in Grove Park, South London. They were refurbishing their property and wanted to keep as much of the original features that they could. In the kitchen they had the original quarry tiles and had attempted to clean the floor themselves but we’re unsuccessful. I quoted for the job and took time to explain the process and which products I would be using.

They contacted me a couple of days later to let me know that they wanted me to carry out the work which was gratifying as I had put a lot of time into the quote. Turns out I got the job because they could see I knew what I was talking about giving them confidence I could do the work and another company had quoted twice the price I gave them and didn’t even pop round to carry out a site survey.

Quarry Tile Cleaning Before Quarry Tile Cleaning Before

Cleaning Hallway Quarry Tiles

I turned up at the agreed time and set about by cleaning the floor with a mixture of Tile Doctor Pro-Clean and NanoTech UltraClean which combine well together to produce a very effective cleaning product that is safe to use on tile and stone. The solution was worked into the floor using a rotary scrubbing machine fitted with a black scrubbing pad; after a while the soiled solution was removed using a wet vaccum and the floor was given a thorough rinse with clean water to see what I had left to deal with.

What was left was a mixture of paint, grease and sticky residues from old carpet tape and if that wasn’t enough there were limescale deposits. To tackle this a stronger product was required so I laid down Tile Doctor Remove and Go and left it to dwell on the tile for about 45 minutes which was sufficient to break down the stubborn marks and allow for them to be scrubbed out. Remove and Go is a strong coatings remover which as its name suggests should remove just about anything and with the exception of the limescale it lived up to its name.

I think it’s a fair statement to say that Tile Doctor have a product to treat every problem and to remove the limescale I used Tile Doctor Grout Clean-Up which is an acid based product usually used to remove excess grout but it’s also effective on the removal of mineral deposits; needless to say it removed the limescale without a problem. You do have to be very careful when using strong products like these on tile so I only left it on the floor long enough to do the job.

The last step was to fit a brush head onto my rotary floor machine and gave the floor a thorough rinse neutralising the floor and making sure that all trace of cleaning products were removed. Once I had finished I locked up the house and left the floor to dry for several days.

Sealing Hallway Quarry Tiles

When I returned I first checked that the floor was dry enough to seal using a moisture meter. The floor was dry so we started the process of sealing the floor with Tile Doctor Seal and Go, the Quarry Tiles were very porous and it tool seven coats of sealer before the tiles were completely sealed. Seal and Go was chosen as the customer wanted liked the low sheen finish this sealer provides whilst also offering excellent stain protection.

Quarry Tile Cleaning After Quarry Tile Cleaning After

The owners were absolutely delighted with the results and they put in a fantastic review about me on the Tile Doctor website.

“Bill Bailey provided an extremely professional and high quality service from first point of contact to end result. He took time to assess the tiles to be cleaned and approached the job with a genuine commitment to get it right and achieve the best possible results. He carefully explained all the processes involved and was able to answer all our questions and provide advice. We would not hesitate to recommend him very highly. Gemma, London

Quarry Tile Cleaning Before and After
 

Quarry Tile Renovation in Grove Park, South London

Quarry tiled floor restoration in Grove Park, South London Read More »

Victorian Tiled Floor in Putney Cleaned and Sealed

Attached are photos from a Victorian tiled hallway floor I completed recently in Putney, South West London. The owner had asked if we could do anything to improve her floor because she has been renovating her house for 2 years since she bought it and had left the floor until last. She didn’t know when it was last cleaned or what products had been used, it’s handy to know a floors history when you’re cleaning it so you know what issues you might face.

Victorian Tiled Floor in Putney Before Cleaning Victorian Tiled Floor in Putney Before Cleaning

Victorian Tiled Floor Cleaning

The first step was to remove any remaining sealer and give it a good clean so I applied a solution of Tile Doctor Remove and Go mixed 50/50 with Nanotech Ultra-Clean to half the floor and left it to dwell while i brought in the rest of my equipment. These two products combine together to create an active cleaning product that can remove coatings; after an hour I then scrubbed it with a rotary machine fitted with a black scrubbing pad and clean water getting on my hand and knees with a scrubbing brush to get into the edges without damaging the skirting board. The last step was to thoroughly rinse the floor and remove any remaining cleaning products which could upset the sealer at a later stage; in fact I rinsed the floor 5 times to be sure. Once this process was complete I repeated it on the other half, I often do hallway floors in two stages so people in the building can still get around without being impacted by the work. I finished off the cleaning using any industrial steamer over the whole floor and plugged in an AirMover to assist with the floor drying before I left for the night.

Sealing Victorian Tiled Hallway

When I returned the next day I checked the floor to make sure I hadn’t missed anything when cleaning and that it was dry enough to apply a Sealer. All was well so I set about applying Tile Doctor Seal and Go which is recommend for Victorian Tiled floors and provides stain resistance along with a durable low-sheen finish. The floor took six coats and as you have to let the floor dry between each coat it took most of the day to complete. Once the last coat was dry I put the AirMover on to help dry it even more and then buffed it with a white buffing pad.

The lady was not there on completion but her mother was and was ecstatic with the result.

Victorian Tiled Floor in Putney After Cleaning and sealing Victorian Tiled Floor in Putney After Cleaning and sealing


Victorian Tiled hallway floor cleaned and sealed in Putney, South London

Victorian Tiled Floor in Putney Cleaned and Sealed Read More »

Scroll to Top