Oxted Tile Cleaning

Oxted Tile Cleaning

Welcome to my Work History archive where you will find examples of the cleaning and renovation of tiles carried out in Oxted.

Limestone Kitchen Floor Cleaning and Polishing Oxted

Large Tiled Floor Cleaned, Polished and Sealed in Oxted

Pictured below is a large Limestone tiled floor in the Kitchen and adjacent living space at a house in Oxted. The tiles were looking quite dull, and the grout had darkened with ground in dirt so I was asked to give them a deep clean and polish to restore the beauty and character to the floor.

Limestone Kitchen Floor Before Cleaning Oxted Limestone Kitchen Floor Before Cleaning Oxted

Limestone is a very tough stone so to clean the tile and rebuild the polish it needs to be polished using a set of burnishing pads which use different grades of diamond encrusted pads to cut through ingrained dirt and build up the polished appearance. Then I always recommend sealing the tiles to protect them from ingrained dirt and stains.

Secondly, it was a large extensive space and although the tiles were of a standard size it took a large number of them to fill the space resulting in what felt like miles of grout lines, all of which would need scrubbing to get them clean.

Cleaning Limestone Tile and Grout

Before working on the Limestone tiles, I decided to treat the grout to a good old-fashioned scrub with a strong solution of Tile Doctor Pro-Clean and stiff wire brush. I knew this was going to take some time so called in my son to provide some extra manpower. He’s young so can scoot around on the floor all day without feeling it later. The grout soon become much cleaner, and the soiled cleaning solution was then rinsed away with water and then extracted with a wet vacuum.

After a well-deserved, lunch we bought in a floor burnishing machine which was fitted with extra iron weights to help it get more traction on the tiles. The first step in burnishing the Limestone tiles involves the use of a coarse 400-grit pad which is designed to deep clean the stone and strip away any remaining sealer. The pad is fitted to the machine and run over each tile several times using only water to lubricate the process.

Once I’d removed any excess residue with the wet-vacuum, I changed to a medium 800-grit pad, repeated the cleaning process, and again extracted the soiled residue. This is followed by a finer 1500-grit using the same process and then finally a super fine 3000-grit pad which really brings up the polish on the tile and is applied using a small amount of water sprayed onto the stone.

By the end of the first day the floor was already looking so much cleaner and lighter.

Sealing Limestone Floor Tiles

After leaving the floor to dry off overnight I returned to the property the next day to apply the sealer. Before starting though I gave the floor a quick skim over with an old pad to make sure it was completely clean before sealing.

To seal the Limestone, I applied two coats of Tile Doctor Ultra Seal which is an impregnating sealer that soaks into the pores of the Limestone to provide durable protection against ingrained dirt without changing the natural look of the tile.

After an hour, I gave the floor a buff with a soft white pad to remove any excess sealer and further bring up the appearance of the stone. Once complete the Limestone had a nice subtle shine and the grout was back to its white colour resulting in the whole floor looking much healthier and attractive.

Limestone Kitchen Floor After Cleaning Polishing Oxted

For aftercare maintenance of polished stone floors, I recommend the use of a cleaning product called Tile Doctor Stone Soap. It’s a gentle but effective floor cleaning product that’s safe to use on sealed floors and helps to maintain the patina on the tile. If looked after correctly this sealer should last three to four years.


Professional Maintenance of a Honed Limestone Floor Tiles in East Surrey

Large Tiled Floor Cleaned, Polished and Sealed in Oxted Read More »

Large Slate Tiled Floor Before After Grouting Oxted

Careful Slate Floor Renovation in Oxted

This was a very large natural Slate floor installed throughout much of the ground floor at a property in the East Surrey town of Oxted. The owner was unhappy with the state of the tiles and especially the grout, however she wanted to ensure I would take maximum care around her Baby Grand Piano. If you have read any of my previous articles you will know I am careful and take time to protect anything that could be stained or damaged with a non-marking film. I therefore assured her I would take maximum care in her home and that it wouldn’t be a problem.

I surveyed the floor and could see that the previous sealer had long since failed and dirt had penetrated the pores of the stone. This made it difficult to clean the floor effectively and resulted in a continually dull appearance. The grout had also trapped the dirt and had gone black as a result. The cure would be to strip the tile and grout of what was left of the original sealer, deep clean and then reseal. Happy with my quote we set a date for the work to start.

Slate Tiled Floor Oxted Before Cleaning Slate Tiled Floor Oxted Before Cleaning

Stripping and Cleaning Slate Floor Tiles

When I arrived on the appointed day, I discovered that the owner had gone to some lengths to pad the piano with bumble wrap mostly to prevent any airborne chemical or dust damage.

Working in sections I started applying Tile Doctor Remove and Go to the floor which is a powerful coatings remover that would strip what was left of the old sealer from the floor. The product is left on the Slate for about ten minutes before scrubbing it in with a rotary machine fitted with black pad. The machine is run at slow speed to minimise splashing and then the slurry is rinsed off the tiles with water and a wet vacuum.

I inspected the floor at this point to ensure the process was having the right effect and it became evident that there was no integrity in the grouting which was crumbling. This was a major problem and it became clear that the only way to resolve it would be to remove and replace all the grout.

Slate Tiled Floor Oxted Failing Grout

Re-grouting a Large Slate Tiled Floor

Over the next couple of days, I cut out all the existing grout with a special tool. They were large format slate tiles however with most of the ground floor needing to be re-grouted it took some time to complete. Once all the grout was removed, I set about applying fresh grout using a colour that highlighted the Slate tiles better.

Slate Tiled Floor Oxted Replacing Grout

Sealing Tumbled Slate Kitchen Tiles

Once the grout had dried, I was able to start applying a new sealer to the Slate tiles. Slate responds well to Tile Doctor Colour Grow which is an impregnating sealer that protects the stone from within. It’s also a colour enhancing product that really brings out the best in natural stone such as Slate.

Slate Tiled Floor Oxted After Renovation Slate Tiled Floor Oxted After Renovation

Two coats of Colour Grout were sufficient to seal the Slate tiles and I think you will agree the stone floor has come back to life and become a fine setting for the Baby Grand Piano.

Slate Tiled Floor Oxted After Renovation Slate Tiled Floor Oxted After Renovation

Before leaving my very happy customer to the enjoy, I left her with customer with a complimentary bottle of Tile Doctor Stone Soap, a neutral and highly reliable cleaner for natural stone floors such as Slate. This will assist her in maintaining the appearance and condition of the tiles going forward. Another satisfied customer!


Professional Cleaning and Sealing of Tumbled Slate Tiles in East Surrey

Careful Slate Floor Renovation in Oxted Read More »

Pitted Travertine Tiled Kitchen Floor Before After Polishing Limpsfield Chart

Pitted Travertine Floor Tiles Renovated in Limpsfield Chart

Earlier this year I went to look at a Travertine tiled floor at a property in Limpsfield Chart near Oxted in East Surrey. The travertine had been laid throughout the Kitchen and adjacent dinner and my client was having trouble maintaining its appearance which had now become dull and unappealing. The Travertine tiles also suffered badly from pitting and dirt had become lodged in the pits of the stone making it difficult to clean. In addition, there was also some staining to the grout lines that needed removing.

Pitted Travertine Floor Before Grout Cleaning Limpsfield Chart Pitted Travertine Floor Before Filling Pitted Stone Limpsfield Chart

I discussed with the client what we could do to restore the floor and we agreed a price for the work to be carried out which would take three days. I’m pleased to say they were happy for me to do the work whilst they were away on holiday

Cleaning a Travertine Tiled Kitchen & Diner Floor

First, we removed the kitchen kickboards and applied protective tape to the skirting boards and around the fridge. Then a strong dilution of Tile Doctor Remove and Go was sprayed onto the tile and grout and left to soak in for fifteen minutes.

Pitted Travertine Floor Before Adding Protection Limpsfield Chart Pitted Travertine Floor Before Filling and Polishing Limpsfield Chart

Remove and Go is designed to remove coatings from Tile and Stone such as sealers so after leaving it to dwell on the floor it was worked in using a rotary floor buffer fitted with a polypropylene brush. The grout lines were then scrubbed by hand paying particular attention to the stained areas. Once that was down the now dirty Remove and Go was rinsed and extracted from the floor using a spinner tool which uses a compressor to apply hot water at high pressure and extracts the slurry into a waste tank. This process was applied first to the kitchen and then to the adjacent dining area.

Pitted Travertine Floor During Cleaning Limpsfield Chart Pitted Travertine Floor During Rinsing Extracting Limpsfield Chart

Filling Pitts in a Travertine Tiled Floor

As the floor dried, I spent the rest of the afternoon filling the pits in the Travertine tile with grout, almost every tile was affected so it took some time. The grout was then left to harden overnight.

Pitted Travertine Floor After Filling Before Polishing Limpsfield Chart Pitted Travertine Floor After Filling Limpsfield Chart

Returning on day 2 a 400-Grit burnishing pad was applied dry to both areas to smooth off the grout that had been applied to the pits the previous day. Only a single pass of the pad was required to remove the excess grout which was then swept off the floor. The grout blended in perfectly with the Travertine which was a mixture of brown and white shades.

Polishing Travertine Floor Tiles

With the pitting issue resolved I set to work restoring the polished appearance of the tiles for which I used a set of diamond encrusted Tile Doctor burnishing pads. Before starting I pre-wetted the floor with water which was sprayed onto the tiles and then applied the 400-grit pad run over the floor ensuring to pass over each tile four times to get an even result. The fine slurry generated was rinsed off with water and the process repeated with the 800, 1500 and 3000 grit pads, to further hone the stone and restore its polished appearance.

Pitted Travertine Floor During Polishing Limpsfield Chart

With two areas to work on the polishing process took up most of the second day.

Sealing a Travertine Tiled Kitchen and Diner Floor

After inspecting the floor on day 3, I set about applying Tile Doctor Shine Powder to the whole floor. This is a crystallising powder that is applied to the floor and buffed in with a red pad. It adds a very high shine to the tiles and provides a tough durable finish.

Pitted Travertine Floor During Shine Powder Polishing Limpsfield Chart

The final result was quite a transformation and what better welcome home present for the client when they returned from their holiday.

Pitted Travertine Floor After Polishing Limpsfield Chart Pitted Travertine Floor After Polishing Limpsfield Chart


Professional Renovation of a Travertine Tiled Floor in East Surrey

Pitted Travertine Floor Tiles Renovated in Limpsfield Chart Read More »

Quarry Tile Cleaning Before and After

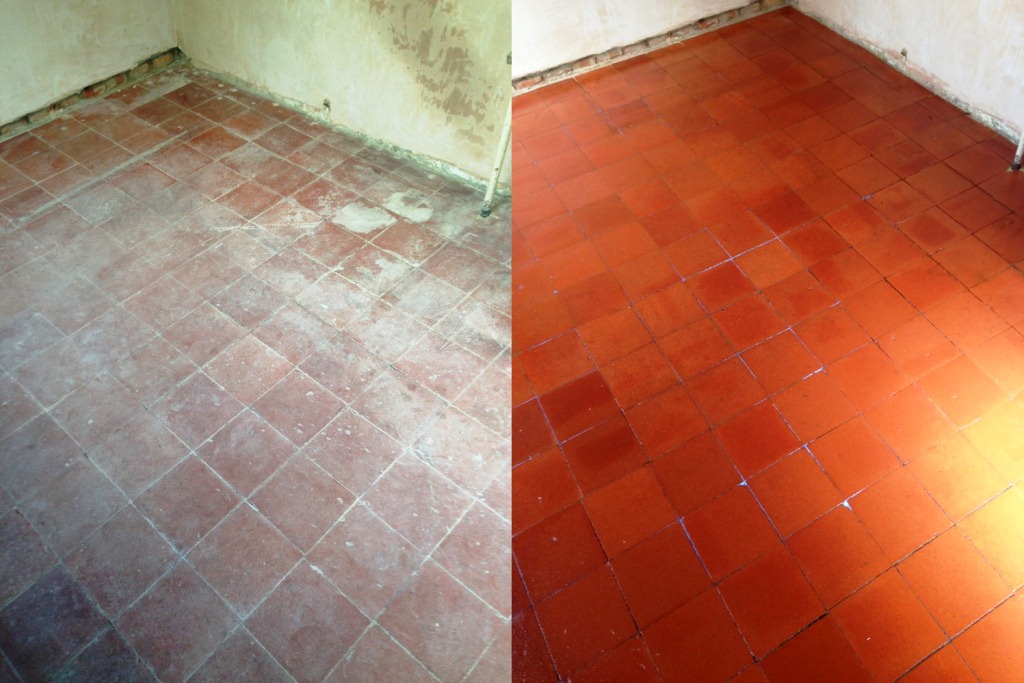
Quarry tiled floor restoration in Grove Park, South London

I recently completed this Quarry Tile restoration work for a young couple in Grove Park, South London. They were refurbishing their property and wanted to keep as much of the original features that they could. In the kitchen they had the original quarry tiles and had attempted to clean the floor themselves but we’re unsuccessful. I quoted for the job and took time to explain the process and which products I would be using.

They contacted me a couple of days later to let me know that they wanted me to carry out the work which was gratifying as I had put a lot of time into the quote. Turns out I got the job because they could see I knew what I was talking about giving them confidence I could do the work and another company had quoted twice the price I gave them and didn’t even pop round to carry out a site survey.

Quarry Tile Cleaning Before Quarry Tile Cleaning Before

Cleaning Hallway Quarry Tiles

I turned up at the agreed time and set about by cleaning the floor with a mixture of Tile Doctor Pro-Clean and NanoTech UltraClean which combine well together to produce a very effective cleaning product that is safe to use on tile and stone. The solution was worked into the floor using a rotary scrubbing machine fitted with a black scrubbing pad; after a while the soiled solution was removed using a wet vaccum and the floor was given a thorough rinse with clean water to see what I had left to deal with.

What was left was a mixture of paint, grease and sticky residues from old carpet tape and if that wasn’t enough there were limescale deposits. To tackle this a stronger product was required so I laid down Tile Doctor Remove and Go and left it to dwell on the tile for about 45 minutes which was sufficient to break down the stubborn marks and allow for them to be scrubbed out. Remove and Go is a strong coatings remover which as its name suggests should remove just about anything and with the exception of the limescale it lived up to its name.

I think it’s a fair statement to say that Tile Doctor have a product to treat every problem and to remove the limescale I used Tile Doctor Grout Clean-Up which is an acid based product usually used to remove excess grout but it’s also effective on the removal of mineral deposits; needless to say it removed the limescale without a problem. You do have to be very careful when using strong products like these on tile so I only left it on the floor long enough to do the job.

The last step was to fit a brush head onto my rotary floor machine and gave the floor a thorough rinse neutralising the floor and making sure that all trace of cleaning products were removed. Once I had finished I locked up the house and left the floor to dry for several days.

Sealing Hallway Quarry Tiles

When I returned I first checked that the floor was dry enough to seal using a moisture meter. The floor was dry so we started the process of sealing the floor with Tile Doctor Seal and Go, the Quarry Tiles were very porous and it tool seven coats of sealer before the tiles were completely sealed. Seal and Go was chosen as the customer wanted liked the low sheen finish this sealer provides whilst also offering excellent stain protection.

Quarry Tile Cleaning After Quarry Tile Cleaning After

The owners were absolutely delighted with the results and they put in a fantastic review about me on the Tile Doctor website.

“Bill Bailey provided an extremely professional and high quality service from first point of contact to end result. He took time to assess the tiles to be cleaned and approached the job with a genuine commitment to get it right and achieve the best possible results. He carefully explained all the processes involved and was able to answer all our questions and provide advice. We would not hesitate to recommend him very highly. Gemma, London

Quarry Tile Cleaning Before and After
 

Quarry Tile Renovation in Grove Park, South London

Quarry tiled floor restoration in Grove Park, South London Read More »

Encaustic Floor Tiles After Cleaning

Cleaning Encaustic Kitchen Floor Tiles in Beckenham

On a visit to a customer to a customer in Beckenham, Kent who had a pair of rugs that needed cleaning I was asked to take a look at her Encaustic kitchen floor tiles which had become dull and she couldn’t keep them clean. I carried out a demonstration on how I would clean them and also explained the different sealer options available and how each sealer can have a different effect. She was pleased with the demonstration and engaged me to clean the tiles as well as the rugs specifying a sealer that would leave a sheen on the tile.

Encaustic Floor Tiles Before Cleaning

Cleaning black Porcelain floor tiles

I set about scrubbing the floor using a hot water dilution of Tile Doctor Pro-Clean Tile and Grout cleaner combined 50:50 with NanoTech UltraClean which adds tiny abrasive particles to the solution to make a more effective cleaning product. The solution was worked into the tiles by scrubbing with a rotary machine fitted with a black scrubbing pad and a stiff hand brush was used along the tight grout lines. The soiled solution was removed using a wet vacuum and floor thoroughly rinsed down with clean water. The tiles were then left to dry with the aid of a Turbo Air blower to help speed up the drying time.

Encaustic Floor Tiles Before Cleaning Encaustic Floor Tiles Before Cleaning

Sealing Encaustic Floor Tiles

Once the tiles were dry I applied five coats of Tile Doctor Seal and Go which is a water based protective sealer that doesn’t give off any odour and produces a nice low sheen the customer was looking for.

Encaustic Floor Tiles After Cleaning
The final result was one happy customer with a clean easy to maintain tiled floor and two clean rugs as well.

Cleaning Encaustic floor Tiles in a Beckenham Kitchen

Cleaning Encaustic Kitchen Floor Tiles in Beckenham Read More »

Travertine Tiled Kitchen floor in Beckenham

A regular customer of mine in Beckenham was having some work done in his house and insisted the builder use my services to seal their newly laid travertine tiled floor. We do see a lot of installation problems at Tile Doctor so I can only commend his foresight.

Travertine Floor Beckenham

Cleaning Travertine Tile

Once the floor was laid I gave the Travertine tiles a thorough clean to remove dirt and grout residue using Tile Doctor Pro-Clean followed by a rinse with water. A rotary machine fitted with a scrubbing pad and wet vacuum come in very handy at this point.

Sealing Travertine Tile

When the Travertine tile was dry it was buffed up using a rotary machine fitted with a Green Twister pad before sealing with two coats of Tile Doctor Ultra-Seal which is a no-sheen penetrating sealer which gives a natural look. Once the sealer was dry it was buffed again, this time using a white buffing pad.

The builder was surprised at how well it came out and the work involved, he now recommends me to other clients.

Travertine Floor Beckenham Travertine Floor Beckenham

My customer now has me back to buff the floor on a regular basis.


New Travertine Tiled Kitchen floor in Beckenham

Travertine Tiled Kitchen floor in Beckenham Read More »

Victorian Tiled Floor After Restoration

Victorian Tiled floor restoration in Lewisham

I’m not sure if Tile Doctor is the reason for this but there seems to have been a marked increase in the restoring of floors that have been found hidden under carpet; this particular floor was Victorian Tiles and the lady who owned the house had discovered it after lifting the carpet that had been down for 15 years and wanted to make a feature of it. The carpet had done a reasonable job of protecting it but it was dull and there were what appeared to be white paint spots on the surface.

Victorian Tiled Floor Before Restoration Victorian Tiled Floor Before Restoration

Cleaning a Victorian Tiled Floor

I started the cleaning process using a solution of Tile Doctor Nanotech Ultra-Clean which is an abrasive tile and stone cleaner mixed 50/50 with Tile Doctor Remove and Go which is a multi-purpose tile friendly stripper that can remove sealers and other coatings. The working space was quite tight so this was applied to half of the floor and left to soak in for an hour whilst I setup equipment. After an hour I scrubbed the floor using a rotary machine fitted with a black scrubbing pad and plain water. The soiled solution was then removed using a wet vacuum before repeating the process on the other half of the floor. The tiled floor was then rinsed twice thoroughly before using a steamer to clean deep into the pores of the Victorian Tile.

Sealing Victorian Tiles

The next step was to Seal the Floor but it needs to be dry first, fortunately I have an industrial airmover fan that speeds this along nicely. The floor was sealed using 5 coats of Tile Doctor Seal and Go which provides stain protection along with a low sheen finish that really brings out the beauty in Victorian Floor tiles. The transformation was quite evident and the owner has very happy with the result and left the following testimonial.

“Fab Service, Great result, Will Recommend.”

Victorian Tiled Floor After Restoration Victorian Tiled Floor After Restoration


Victorian Tiled Floor Cleaned and Sealed in Lewisham

Victorian Tiled floor restoration in Lewisham Read More »

Black Porcelain Floor After Photo

Putting the Shine Back on Black Porcelain Floor Tiles

We were asked to clean and seal these black Porcelain floor tiles that had been laid in a bridal shop in the Lakeside shopping centre. The shop fitters and builders had been in to setup the internal layout and the floor was looking dull and not in a presentable state good enough for the shop opening.

Black Porcelain Floor Before Photo

Cleaning black Porcelain floor tiles

We set about scrubbing the floor using a dilution of Tile Doctor Pro-Clean Tile and Grout cleaner followed by a thorough rinse. We then waited for it to dry before buffing the porcelain tile surface to a deep shine with a white buffing pad.

The floor was ready for sealing so we applied Tile Doctor Ultra Seal to a small test area but it didn’t take, not wishing to waste our time or the customers’ money we called it a day. Most porcelain tiles won’t take a sealer however some are micro porous and do need sealing so it’s always best to check.

Black Porcelain Floor After Photo
They were really pleased with result and they were even happier we were honest about not charging them for not sealing the floor; the deep shine on the floor really did look spectacular.

Black Porcelain Floor Photo
 

Restoring the Shine on Black Porcelain Floor Tiles

Putting the Shine Back on Black Porcelain Floor Tiles Read More »

=================================

East Surrey Tile Doctor

================================= Read More »

Scroll to Top