Weybridge Tile Cleaning

Weybridge Tile Cleaning

Welcome to my Work History archive where you will find examples of the cleaning and renovation of tiles carried out in Weybridge.

Ceramic Tiled Shower Transformation Weybridge

Refreshing a Mouldy Ceramic Tiled Shower Cubicle in Weybridge

Having seen some similar work of Ceramic tiled shower cubicle refresh I had completed I was asked by a homeowner in Weybridge to pop round to their house and do the same for them. A shower cubicle refresh is usually quite straight forward and can be completed in less than a day so I can usually provide a quote based on a few photographs.

Showers are often in daily use and even more frequently in large families, so it’s not surprising that the tile and grout can discolour and if ventilation isn’t adequate mould can form. This can be reduced with the regular use of a squeegee, the liberal squirting of a decent cleaning product and often just leaving a window open can improve ventilation. In this case however and with a very busy household it was a struggle to keep on top of the problem and in this case, external help was needed.

Ceramic Tiled Shower Before Cleaning Weybridge

You can see from the photograph that although the white ceramic tiles were in good condition the appearance of the cubicle was severely let down by discoloured grout and an overuse of mastic which had turned black with mould.

Deep Cleaning a Ceramic Tiled Shower Cubicle

Work started with the removal of the layers of mouldy mastic which were carefully scrapped away using a sharp knife. This would be replaced later, however in my experience even the most expensive anti-mould sealants in a location like this rarely last longer than three to four years before they need replacing.

With the grout fully exposed it was cleaned with the aid of a stiff wire brush and an acid based cleaner call Grout Clean-up. This got the grout clean but not white consistently enough to match the rest of the shower cubicle, this was always a possibility, and I had previously discussed that it might be necessary to apply a grout colourant.

The process was then repeated on the tiles using a scrubbing brush with more Grout Clean-up taking care to keep it away from any chrome as it can cause it to discolour if you’re not careful. The Ceramic tiles have a glazed coating and clean up relatively easily in comparison to the grout.

Following this the shower wall was wiped down with water to provide a general clean and remove any debris left over from cleaning.

Grout Colouring a Ceramic Tiled Shower Cubicle

I had thought that as the grout dried following the cleaning it might be ok against the white tiles however the staining had been left in place too long and it was clear a colourant would be needed. I did this over the course of a few hours, using a White colourant from the Tile Doctor Grout Colourant range. White is just one of eleven colours available in the range and was chosen in this case to give the grout a really fresh look and to blend in with the White Ceramic tiles.

The application of Grout Colourant not only colours the grout joints – it also seals and rejuvenates them. It also dries quickly, so I could apply a second coat quite soon after the first, removing any excess as I went.

Finally, once everything was dry, I applied mastic around the shower tray base and the two verticals. The shower cubicle was completely transformed by the renovation and ready for use again later that afternoon.

Ceramic Tiled Shower After Renovation Weybridge


Ceramic Tiled Shower Cubicle Cleaning and Grout Recolouring in Surrey

Refreshing a Mouldy Ceramic Tiled Shower Cubicle in Weybridge Read More »

Limestone Kitchen Floor Cleaning and Polishing Weybridge

Large Limestone Tiled Floor Stripped and Resealed in Weybridge

The photographs below were taken at a property in Weybridge where the owner had Limestone tiles installed throughout the Kitchen and adjacent dining room. Like any stone floor the sealer and appearance will degrade with use and in this case the tiles and especially the grout had become darker with ingrained dirt. The owners had decided it was time to the floor professionally cleaned and asked me to quote for the work.

Limestone is a beautiful stone that cleans up really well but to get the best out of it needs to be polished with burnishing pads using heavy equipment, something the tile shop salesman usually forgets to mention.

Limestone Kitchen Floor Before Cleaning Weybridge

Having surveyed the floor I worked out a renovation plan which included tile and grout cleaning, stone polishing and finally sealing to protect it going forward. Happy with my quote we set a date for the work to begin.

Resealing a Polished Limestone Floor

My first job was to protect the kitchen cabinets from splashing with a sheet of decorator’s plastic about a foot from the ground upwards. I also like to apply a thin line of transparent mastic at the base of the cabinets where they meet the tile as this is usually a place where unwanted water can find its way in.

Once the kitchen woodwork was protected, I set about deep cleaning the grout. To do this I run a dilution of Tile Doctor Pro-Clean along the grout lines then leave it to dwell for five minutes and then scrubbed by hand using a wire brush until clean. All the waste is then rinsed off and extracted with a wet vacuum.

With the grout now clean and the soil removed I set up my rotary floor cleaning machine ready to burnish the stone tile and restore the finish with a set of diamond encrusted burnishing pads.

The first pad in the set to be applied is a coarse 400 grit pad that is designed to open the pores of the stone allowing dirt to be flushed out and removes existing sealers in the process. Water is used for lubrication and the during the following hours the process was repeated with the medium 800 grit and fine 1500 grit pads which gradually close the pores, buildup the polish and return the shine. This is a wet process which generates a slurry which is removed with after each pad with the wet vacuum.

Once the whole floor had been burnished it was given a final rinse and dried as much as possible with the wet vacuum. It was then left to fully dry off fully overnight.

Sealing Limestone Tiles

Returning the next day, I tested the floor was dry with a damp meter which confirmed the floor ready for sealing. The customer wanted a natural look to the floor so we chose to apply Tile Doctor Ultra-Seal which adds almost invisible protection. This sealer is an impregnator which soaks into the pores of the stone preventing dirt from becoming ingrained and keeping it on the surface where it can be easily removed. Two coats were applied and this should keep the floor protected for many years to come.

Limestone Kitchen Floor After Cleaning and Polishing Weybridge

Once complete I advised the owner to stay off the floor for an hour or so and then they can return the furniture. For aftercare cleaning I recommend Tile Doctor Stone Soap which is a gentle but effective cleaner that will keep the floor clean whilst maintaining the patina and without harming the sealer.


Stripping and Resealing a Polished Limestone Floor in West Surrey

Large Limestone Tiled Floor Stripped and Resealed in Weybridge Read More »

Block Paved Patio Cleaning in Weybridge

Brick Block Paved Patio Cleaning in Weybridge

This is a great example of a Block Paved Patio at a house in Weybridge that I was asked to renovate. Garden patios are exposed to a multitude of elements in this country, wind, rain, snow etc. They are often surrounded by vegetation. The rough nature of block paving and stone attracts dirt so it can benefit from an annual deep clean to keep them in check.

Block Paved Patio Before Deep Cleaning in Weybridge

Another problem we face is black spot from lichen which thrives on rough surfaces in the damp and shady conditions that are so common in the UK. The characteristics of the lichen are that as it matures, it sends out tendrils (hyphae) into the pores of the material seeking nutrients from the minerals in the brick and the detritus that collects on the patio. These gradually spread through the affected surface.

I visited the property to take a detailed look at the patio and decide on the best remedy to get it renovated. I discussed the process with them, gave them a price and arranged a time to return to complete the work.

Cleaning a Brick Block Paved Patio

I find the most effective way to clean a patio affected by the UK weather is to start with an industrial jet wash. These machines are quite powerful and apply water under high pressure to dislodge the detritus and exposes what lies beneath.

The next step was to carefully apply Tile Doctor Patio & Brick Driveway Cleaner, it is a very strong product sold for professional use. Due to its’ high strength you need to wear rubber gloves and eye protection, however you need to use a powerful product like this to power through the blackspots, lichen, moss, and stains.

For the best results you need to allow this product to soak in for at least thirty minutes before scrubbing it in with a deck brush and then rinsing off with water. For deep staining you need to leave the product on for longer.

Once done we made sure the area was thoroughly rinsed with water. There is no need for this type of patio to be sealed. However, we did recommend scheduling in an annual return visit to keep the driveway in good condition, we do offer a Tile Doctor Maintenance plan.

Block Paved Patio After Deep Cleaning in Weybridge

As you can see from this example the method worked well and the patio came up like new. Needless to say, my client was very happy with the work we carried out.

It’s worth knowing that Tile Doctors have the equipment and products to clean all types of hard surfaces internal and external so if you need help with your driveway or patio do get in touch.


Professional Renovation of a Brick Block Paved Patio in West Surrey

Brick Block Paved Patio Cleaning in Weybridge Read More »

Red Brown Marble Tiled Floor Before After Polishing Weybridge

Red and Brown Marble Tiled Kitchen Floor Polishing Weybridge

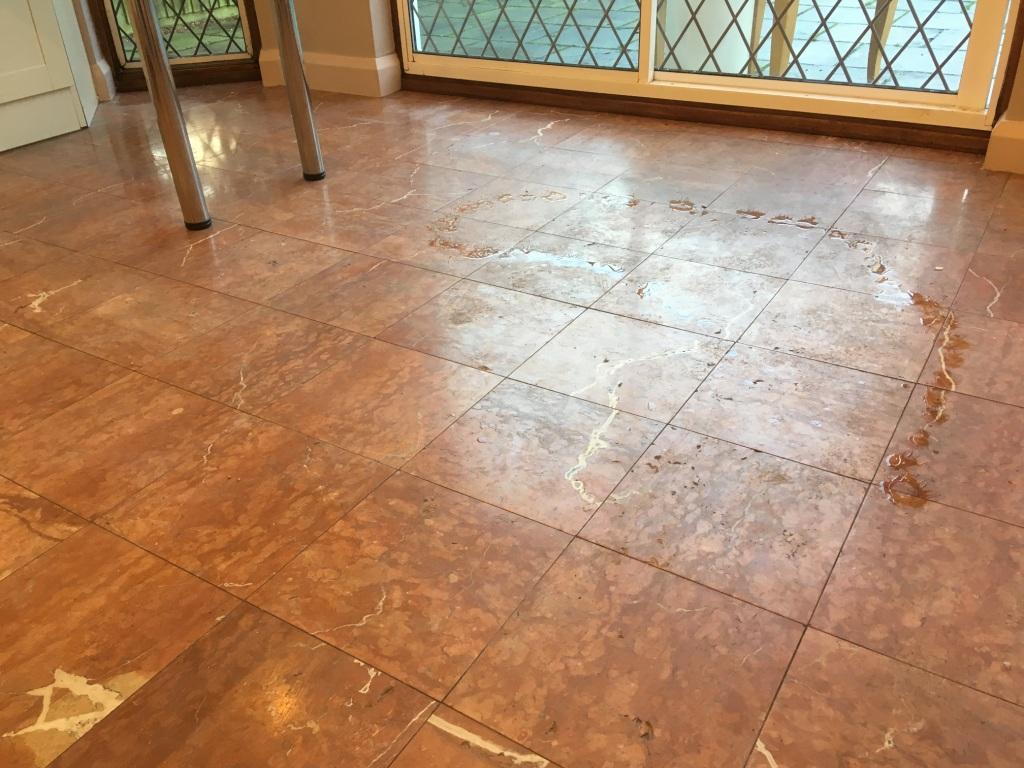
If you have a Mable tiled floor which is not looking its best, then the transformation I achieved on this floor at a property in Weybridge will definitely be on interest. Having first spoken with the owner on the phone I went over to the house to take a better look at the floor and found that the deep red and brown Marble tiled kitchen floor was really dirty and totally lacking in colour or polish.

The floor hadn’t been professionally cleaned for some time and was now dirty and suffering from the actions of a puppy which likes to charge up and down. The Marble was also full of holes which the client explained had been getting larger. This is not usual for natural stone as it can be very sensitive to acidic cleaning products which if used constantly over time will start to dissolve the stone.

We discussed the remedies available, agreed a cost and arranged a mutually convenient time to carry the work out. I always like to do a site visit to survey the tiles and ideally run a test clean to determine the best methods for resolving the problems. This enabled me to give a more accurate quote and it also gives the customer confidence in my abilities.

Marble Tiled Floor Before Polishing Weybrige

Deep Cleaning Red and Brown Marble Kitchen Tiles

Firstly, I removed the existing sealer with a 400-grit diamond burnishing pad which is applied with water. Although this initially appears to make the floor look worse, this is only temporary, sometimes you have to make it look a little worse before it can get better! Once this was done the floor was rinsed with water to remove the slurry generated and this was then extracted off the floor with a wet vacuum.

Then for the next couple of hours I worked my way from the back door to the front filling all holes with a special expanding resin, then smoothing off as I went to ensure the smoothest of finish could be achieved. Some of the holes were indeed quite large, so there was quite a lot of work to do.

Once the filler had dried I started the polishing process using the 800 and then 1500 grit burnishing pads, once again with more water to lubricate and rinsing the floor in between polishing and removing the slurry as before. This process took much of the day, so I left the floor to dry off and came back the next day to complete the polishing and seal the Marble.

Sealing Red and Brown Marble Kitchen Tiles

The next day I returned and completed the polishing process by applying the fourth burnishing pad which is an extra fine 3000 grit pad, you apply the pad dry with only a little amount of water sprayed onto the floor in process we call a spay burnish and this final pad really brings up the polish in the Marble.

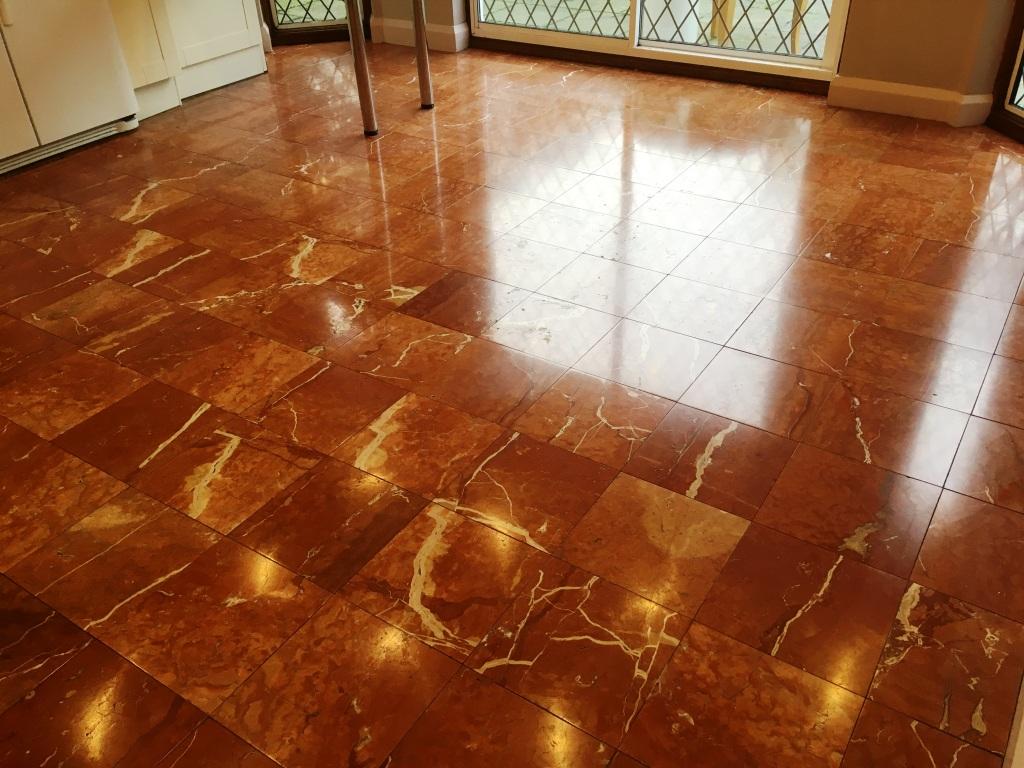
Once the polishing had finished I left the floor for a little while to make sure it was nice and dry and then I applied two coats of Tile Doctor Colour Grow sealer. This is a colour intensifying sealer that provides durable protection by impregnating the pores in the stone with sealer, so dirt cannot become ingrained there. As you can see from the pictures the sealer dramatically enhanced the natural colours in the stone.

Once dry I backed my way out of the house with a final finishing polish using a white buffing pad to remove any excess sealant and bring up the sheen of the tiles even further. I left instructions with the client to keep off for a couple of hours while the sealer cured.

The client was over the moon with the end result, the floor was left shiny, protected and looking in a fabulous condition.

Marble Tiled Floor After Polishing Weybrige


Professional Restoration of a Marble Tiled Kitchen Floor in West Surrey

Red and Brown Marble Tiled Kitchen Floor Polishing Weybridge Read More »

=================================

East Surrey Tile Doctor

================================= Read More »

Scroll to Top